• Home
  • Shop Our Home
    • Shop Our Home
    • Amazon Shop
  • About
    • Meet Bre
    • FAQs
    • Disclosure
    • Design Shop
  • Project Gallery
  • Design Services
  • Popular Posts
    • How to Paint Your Tile Backsplash
    • How to Add Trim and Paint Your Laminate Cabinets
    • Modern Vintage Bathroom Reveal
    • Modern and Vintage Boy’s Nursery Reveal
    • How to Build a DIY Leaning Ladder Shelf
    • DIY Modern Step Stool
    • Where to Buy the Best Faux Fiddle Leaf Figs for Under $100
    • Best Place to Buy Throw Pillows
  • Contact

brepurposed

You are here: Home / DIY Home Decor / How to Paint a Scalloped Wall
DIY Home Decor, How Tos

How to Paint a Scalloped Wall

08/26/19

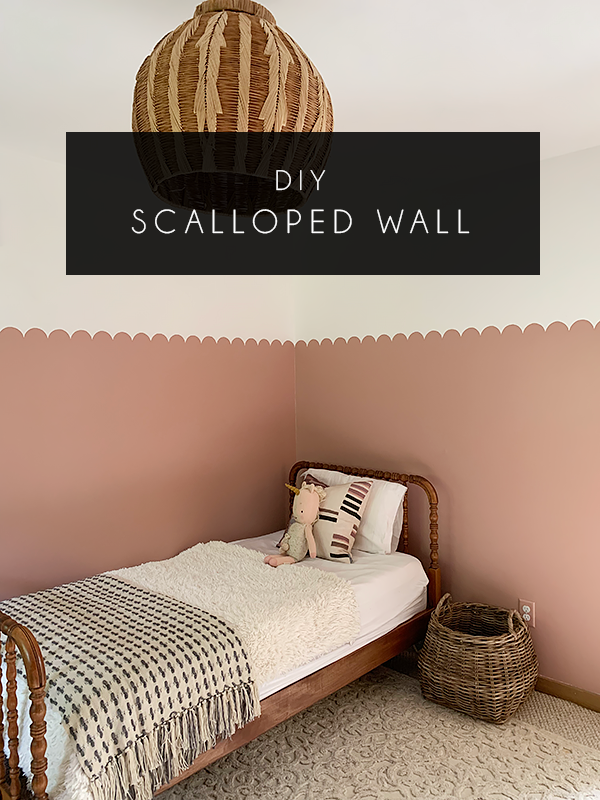
HOW TO PAINT A SCALLOPED WALL

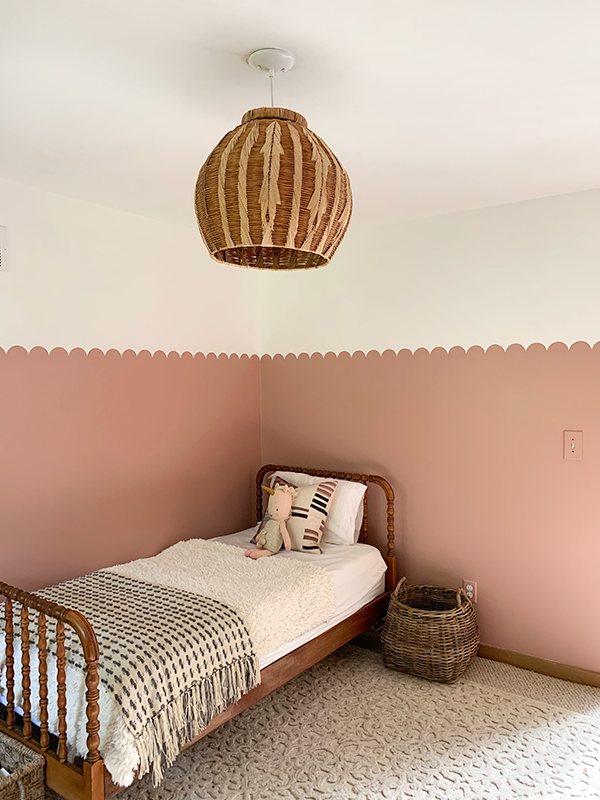
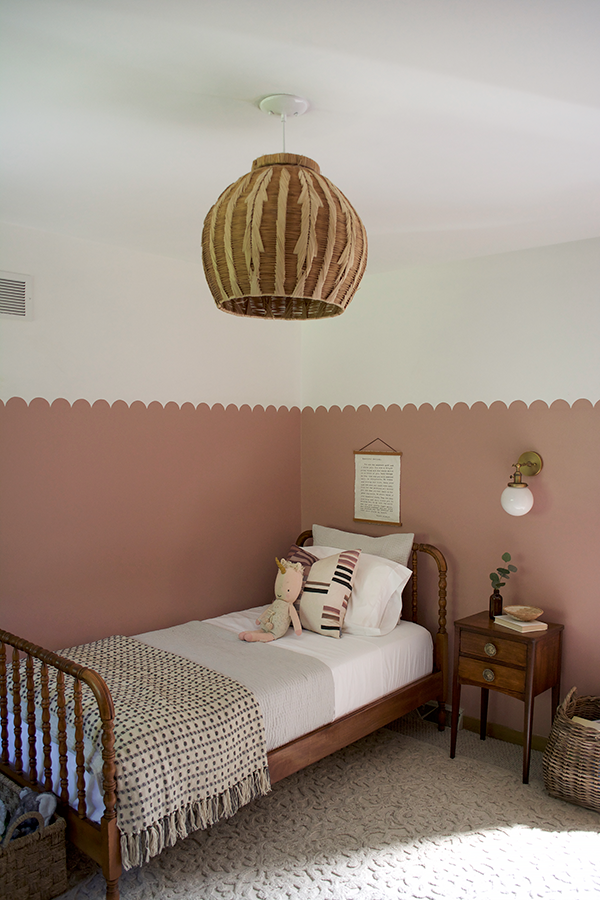
When it came to design Eloise’s new big girl room, I knew pink was going to be involved. It’s her favorite color and there was no escaping it, which was fine with me. But I wanted to do something fun and not just paint all the walls pink so I came up with this fun idea for a Scalloped Wall Design.

When I first thought of the idea, I wasn’t sure how I was going to execute it. I actually didn’t figure it out until after I had painted the walls 2/3 of the way up on all sides.

But now that I’ve figured out that painting scallops on a wall isn’t all that hard – I’m here to share all my tips with you!

SUPPLIES FOR PAINTING A SCALLOPED WALL

  • 3″ wooden embroidery hoop
  • short bristled paint brush
  • pencil
  • painters tape
  • level

STEP 1

Use a long level to draw straight lines across your walls as far up as you want them to be. I went 62″ up from the base.

STEP 2

Apply your painters tape just above the lines you drew. This way you’ll cover up the pencil marks when you paint.

STEP 3

Using some paint that is the same color your walls currently are (in our case, white), paint just over where the bottom of the painters tape meets the wall. This provides a barrier of paint that will help prevent against bleed.

You can see in the photo below where the white paint overlaps the tape.

Pink Wall in Toddler Girls Room

STEP 4

Once the white paint is dry, use your roller and paint the walls in your desired color. We used Retro Pink by Behr which is a very pretty neutral and mauve pink that isn’t too in your face. You better believe if Eloise picked the color it would have been BRIGHT pink 😉

retro pink by behr

STEP 5

Immediately after your last coat of paint, remove the painters tape. Removing it while it’s still wet will prevent against peeling.

How to Get Straight Lines with Painters Tape

STEP 6

Next up is your scallops. I originally thought I would use a stencil, but couldn’t find any in the stores near me and really couldn’t find any online that seemed like they would work well.

So I stumbled upon a wooden embroidery hoop at JoAnns and decided to give that a try instead. I used a 3″ hoop and popped out the inner hoop and used that. I marked with my tape a little less than halfway on opposite sides. I didn’t want a full half circle so mine are a little less.

How to Trace Scallops on the Wall

Using the blue tape on the inside of the hoop as a guide, trace your half circles on the wall.

Tracing Scallops on a Wall

Tip – since you most likely won’t have a whole row of full half circles, think about where you want to start and where you don’t mind there being a portion of a scallop.

For me, I started on the right side of the wall her bed is against, and worked to the left, knowing whatever I was left with would be by her closet door trim and not in a spot more noticeable.

STEP 7

For the corners, I used a piece of card stock and traced a half circle using the embroidery hoop as a guide. Then I cut it out and was able to fold it so the scallop would be seamless from one wall to the other in each corner.

Painted Scallop Wall Tutorial

STEP 8

Paint your scallops! I promise this isn’t as intimidating as it sounds. Using a brush with short bristles helps a ton and gives you a lot more precision. Mine definitely aren’t perfect which I’m fine with and you can always go back and use some white paint to even them out if need be.

I’m having trouble finding a link to the brushes I used, but I picked them up at Hobby Lobby!

Painting Scallops on a Wall in a Little Girls Room

You could definitely paint inside the embroidery hoop but I was worried about paint bleeding through leaving a mark each time I picked it up, so I free handed it instead.

DIY Painted Scalloped Wall

I ended up doing three coats but really the first one is the most important. I didn’t have to be as careful with the second two coats since I already had the main shape painted.

DIY Pink Scalloped Wall

I LOVE how these turned out and add a little extra fun and femininity to Eloise’s room. I originally thought I would do larger scallops but this size feels so perfect. 

Pink Scalloped Wall in Girls Room

Pink Scalloped Walls in Girls Room

Retro Pink Wall by Behr with Scalloped Detail

Pink Scalloped Wall

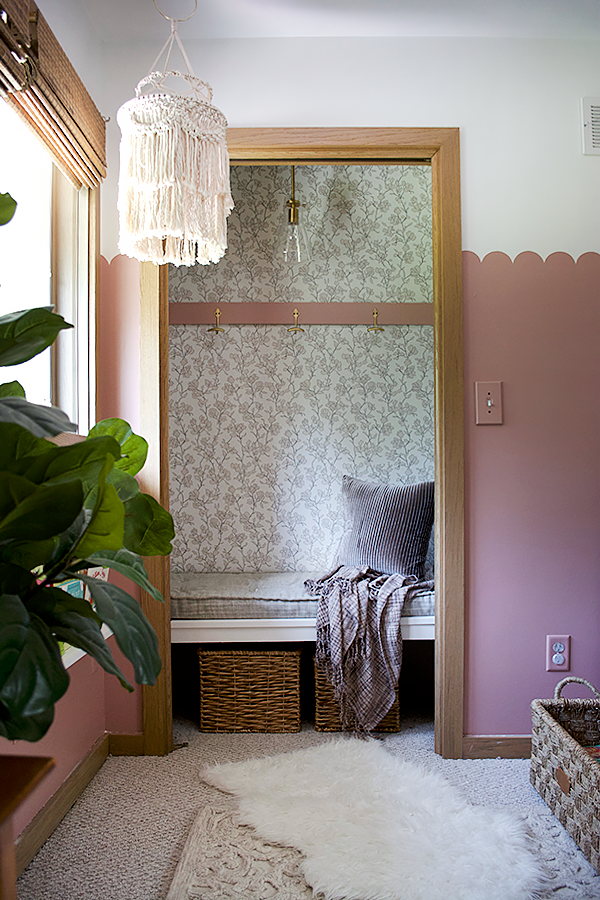
I hope this tutorial of How to Paint a A Scalloped Wall was helpful! It’s such a fun and easy way to add some charm and character to a space! Her room isn’t quite finished yet, but we’re getting close -stay tuned for the full reveal soon!

Related

12 Comments

Comments

  1. Sarah says

    December 16, 2019 at 9:00 am

    So darling. What paint color is the white you used??

    Reply
  2. anastasia says

    August 30, 2019 at 9:06 am

    Wow wow wow… It is so cute, cute idea and cute room! The ambiance feels warm. I think your daughter love it very much.

    Reply
  3. Kayla says

    August 29, 2019 at 10:17 am

    This is looking great – where is the wicker lamp from??? I’m loving that thing!

    Reply
  4. Alicia says

    August 26, 2019 at 1:03 pm

    What a cute idea! The room is looking lovely. 🙂 Can’t wait to see the whole thing!

    Reply
    • brepurposed says

      August 27, 2019 at 12:09 pm

      Thank you so much Alicia!!

      Reply
  5. cassie bustamante says

    August 26, 2019 at 10:28 am

    this is SO cute! i did almost the same thing about 12 years ago in Emmy’s nursery! Except i made it large polka dots, so imagine you drew the hole circle and painted it in… different color on top and bottom like yours. I used a formula can lid. HA!!!! I love how her room has come along and love the scallop! (PS I thought I had embarrassing pics on my blog, but I apparently had already painted over it in 2009 when I started blogging.)

    Reply
    • brepurposed says

      August 27, 2019 at 12:09 pm

      ha that’s awesome! I wish I could see it! Thank you Cassie <3

      Reply

Trackbacks

  1. Kids Room Update: Do We Lean In or Pull Back? You Want BOTH. We Try 12 Different Colors Of Scallops On The Wall… – Superior Custom Floor Designs says:
    May 13, 2020 at 4:03 am

    […] design by design by bre bertolini | right: design by emma på […]

    Reply
  2. The “Decorative” Trend I’m Leaning Into And How I’m Going To Bring It The Kid’s Room – BRING ON THE CRAZY - trylamp says:
    April 20, 2020 at 12:25 pm

    […] design by bre bertolini […]

    Reply
  3. The “Decorative” Trend I’m Leaning Into And How I’m Going To Bring It The Kid’s Room – BRING ON THE CRAZY – Superior Custom Floor Designs says:
    April 20, 2020 at 4:05 am

    […] design by bre bertolini […]

    Reply
  4. Mid-Century Nursery Reveal - A Textured Home by Morgan Edwards says:
    April 18, 2020 at 9:24 am

    […] stole the scallop edge idea from a friend and fellow blogger, Bre Bertolini. Check out her tutorial here. It was super easy and faster than I imagined, I love the way it turned out. I used Behr paint; […]

    Reply
  5. Girls Pink Room Makeover | brepurposed says:
    September 4, 2019 at 6:00 am

    […] created a mood board earlier this year with this fun scalloped design wall and when I brought it to life it turned out even better than I imagined. Eloise wanted pink walls […]

    Reply

Leave a Reply Cancel reply

hi I’m bre! follow along as we renovate our current home and share modern DIY ideas.

  • Facebook
  • Google+
  • Instagram
  • Pinterest
  • RSS
  • Twitter

Shop My Faves

We spent a few days this past week at the @thedwel We spent a few days this past week at the @thedwellbox in Amish Country and never wanted to leave! More and more lately we’re realizing the importance of family and nurturing those relationships. This was the perfect place to unwind, reconnect and enjoy an adventure together without worrying about capturing it all on our phones. We went for a hike, sat by the fire, ate wayyy too many pastries and cheeses and loved every minute of it. Sharing a video tour in stories today! If you’re in the area - we highly recommend a stay here!
FREE 2021 Printable Calendar is on the blog today! FREE 2021 Printable Calendar is on the blog today! As always, there’s two sizes for you to choose from and a short easy tutorial for you to follow to make the cute little wooden stand too 📅  My little office nook has gone through a lot of phases since we first moved in 4.5 years ago (swipe through to see them all!) and last year I finally upgraded my desk to one I could properly sit at 🤣 I took two Alex drawers from IKEA and added wood trim and caning for an elevated look and topped it off with a faux butcher block counter made from a $30 door slab. 👊🏻 the cherry on top for this space was our new skylight that instantly brightened it up and brings in so much beautiful natural light ☀️ this nook never felt quite right until now and I’m excited to spend more time here this year working on lots of exciting projects! Head to www.BREPURPOSED.com to snag your free calendar! #breinspired
Oh 2020. While it wasn’t what any of us expected Oh 2020. While it wasn’t what any of us expected I’m focusing on all the good that came out of it. I remember sitting with Dan New Year’s Eve last year and being so hopeful for what our future held and praying it would bring us another baby after we had been trying with no luck. I found out only a couple weeks later I was pregnant and that joy carried us through the year even though it brought fear and worry along with it. Besides welcoming our sweet baby girl into our lives we experienced so many other amazing things. The time we got to spend as a family is something we’ll always cherish. We worked on so many projects together and continued to pour our hearts into making this house a place we can call home. And we built A LOT of arches 🤣 Eloise was on the cover of a magazine, Hawk’s hair grew back in full force, we beat Covid and captain Christmas reminded us what the holiday season is really about.  but most importantly we leaned into god and relied on him more than ever to get us through each day. That’s the relationship I want to continue to work on and I’m grateful that this year nudged me closer to the One who deserves all the glory and continues to be faithful 🙏🏻 happy new year friends 🤍 cheers to 2021 🍾
wishing you all a very merry Christmas!🎄your lo wishing you all a very merry Christmas!🎄your love and support means the absolute world to our little family - thank you for being here with us! 🤍 #averybertolinichristmas
Family is here, Candles are flickering, fire is bu Family is here, Candles are flickering, fire is burning, and there’s a Christmas movie playing 🎄🔥 soaking up these last couple of days before the big guy comes 🎅🏻
#christmasiscoming #homefortheholidays
Unloading all the holiday photos from my camera ro Unloading all the holiday photos from my camera roll before Christmas is over 🎄 dan’s not going to be happy but those branches are staying up all winter - he might need to start wearing safety goggles in the house 🤪 #youllpokeyoureyeout
.
.
.
.
.
.
#bhghowiholiday #entrywaydecor #entrytable #neutralchristmas #holidayvignette #christmashomedecor #christmastable #mycb2 #countrylifestyle #mcgeeandco
Plotting ways I can stay right here all day and I’m thinking a Christmas movie marathon will do the trick 🎄🎅🏻❄️ how long do you think that would last before someone asks for a snack? 🙈 ONE WEEK til Christmas! 😱Are you done shopping and wrapping? What’s left on your Xmas bucket list?? #christmascountdown 
.
.
.
.
.
.
#cozyvibes #cozychristmas #mantledecor #christmashome #stayinbed #christmasbedroom #showemyourholiday #aidsundaysharies #fireplacedecor #lonnyliving #housebeautiful #rshome #idcoathome #ispyraddesign #aabhome
Which view do you prefer? 🤪 we compromise every Which view do you prefer? 🤪 we compromise every year: Dan and his dad get their giant artificial tree with colored blinking lights, handmade ornaments (and this year, tinsel) and I get my real tree with white lights and neutral ornaments. If you’ve been following all the Captain Christmas adventures on my stories you know I let Dan go all out and he hung tinsel garland and colored lights ALL over our house. I decorated a few small areas but I was getting SO unnecessarily stressed thinking about decorating our entire home and creating perfect content for you guys. So I said F it and it felt SO good. And it brought so much joy to him and the kids. And for that, it was worth it 🙌🏻 there’s nothing wrong with a beautifully styled Instagram worthy home but this time of year should be a reminder of the things that truly matter in life - and I don’t want to miss out on them. However you decorate for christmas I hope you can find joy in it 🙌🏻 and maybe let go of those picture perfect expectations a little 😉 captain Christmas stories are saved in a highlight! 🎄#2020 #breinspired #ohchristmastree

POPULAR POSTS: DIY LADDER SHELF | PAINTING TILE BACKSPLASH | HOW TO INSTALL WOOD LOOK TILE | PAINTING LAMINATE CABINETS | HOW TO REFINISH A DRESSER | DIY STEP STOOL | FAUX FIDDLE LEAF FIG TREE | BEST PLACE TO BUY THROW PILLOWS

PRIVACY POLICY

© Copyright 2021. brepurposed. All Rights Reserved. Designed by Oh Wild.