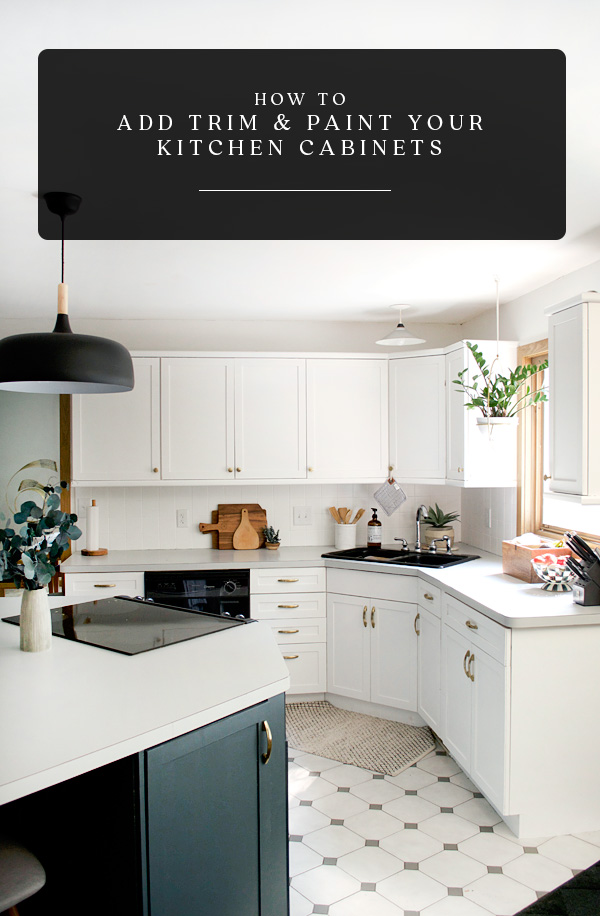
Our kitchen cabinets are pretty plain and basic which provided me with the perfect opportunity to update them with some paint and trim. I can’t believe the difference it’s made in our kitchen, and if you’re in the same place as us and aren’t in the right place to do a major kitchen renovation, then this is the way to go. So I’m gonna tell you all my secrets on How to Add Trim and Paint Your Laminate Cabinets. This of course will work on wood cabinets as well, but a few of the steps might vary.
Here is what our terrible cabinets looked like before:

And a wider view of the whole kitchen:


SUPPLIES FOR PAINTING YOUR KITCHEN CABINETS AND ADDING TRIM
HOW TO ADD TRIM AND PAINT YOUR KITCHEN CABINETS
STEP 1
Use tape to label the backside of your cabinet door and the inside of your cabinets so you know where they should go when you’re ready to hang them back up.

STEP 2
Remove your cabinet doors and place all hardware/screws in a ziploc baggy for safe keeping.
STEP 3
Set up your doors on saw horses or somewhere easy to move around them on all sides. The higher the better so you aren’t bending down and killing your back.

STEP 4
Clean your cabinet doors. I used clorox wipes which did the trick and got all the dirt and grime off.
STEP 5
Tape off the back of your doors if you don’t plan on painting the backs so the paint doesn’t drip over the edges.
(*this is an optional step. I did it on my first set, but didn’t on the rest because I realized there wasn’t much drippage anyway with using a roller)

STEP 6
Sand the fronts of your doors. You can use a palm sander or just a sanding block. Just be sure to rough them up a bit so the primer has something to stick to.
(SKIP STEPS 7-13 IF YOU AREN’T ADDING TRIM)
STEP 7
Cut your trim pieces. We bought 2×4 1/4″ pieces of plywood and stripped them down into 2″ thick strips on the table saw. Our local Home Depot/Lowes wouldn’t cut pieces that small for us, but I know some do, so it’s worth asking if you don’t have access to a table saw of your own.

STEP 8
Cut your trim pieces down to size for each door with a mitre saw. I had two pieces go the full length vertically and then filled in the other two horizontally.

STEP 9
You can lay out your trim on your doors once you’ve cut them, then I went back and sanded down the edges so everything was smooth. I found that using a palm sander worked best for this rather than a sanding block.
STEP 10
Glue the trim down. I used DAP Rapid Fuse which I’m obsessed with. It takes seconds to dry and holds SO well. I only had to use a clamp a couple times when my trim was a little warped and needed a little extra help staying flat on the doors.

STEP 11
Use wood filler to fill in the cracks in each corner. Depending on how close your trim is, you might only have to do this once, but I did it twice most times to make sure it was super smooth.

STEP 12
Sand the filler down once dry. Again, I found I got the best results with my palm sander.

STEP 13
After sanding make sure you vacuum or wipe off all the dust particles.
*UPDATE – something you should do next is caulk all your inside edges before painting. I didn’t do that and wish I had. It will give your cabinets a much cleaner look as well as make them easier to clean when dust builds up on those inside edges!
STEP 14
Prime! I started with my 1″ brush and did the inside border of the doors first to make sure I got the sides of the trim. Then I used a foam roller for the rest of it. And I only did one coat of primer.
A lot of people spray their cabinets, but I find brushing and rolling to be just as effective. And the clean up is easier! These tips from Cathy at The Grit & Polish about Painting Cabinets by Hand will also help you along the way!
I also suggest picking up a cabinet and resting it against your leg – then using your roller to get all the sides. Then you can place it back down on the sawhorse and roll the last side that’s facing you.


STEP 15
Sand once the primer is dry.
STEP 16
Paint! I used Valspar Reserve in the color Du Jour because that’s what I had left over from our walls. I read great reviews about using it on cabinets too so I went for it and am super happy with the results. Just make sure you’re using a satin or glossy paint – not matte or eggshell. Ours was satin.
For the island cabinets I used Lead Gray by Benjamin Moore.
I followed the same process of using my paintbrush first to get the inside border, then used my roller for the rest.
I ended up only needing two coats but my cabinets were already a light color and I was painting them white so it didn’t need much. If you’re going darker you might need more coats. Just play it by ear.
STEP 17
Paint the trim and any other areas that will be showing back inside your kitchen. This doesn’t necessarily have to happen in this order, but it’s something you can be doing while you’re waiting for your paint to dry. I painted over the grey plastic trim which made a huge difference too.
STEP 18
Let them cure. Read your paint and see what it says about curing time but you don’t want to hang them back up right away. You want the paint to settle and harden a bit before they’re thrown back into the craziness of your kitchen. I let mine cure for at least 2 days – some sets were longer depending on how ambitious I was that week :-p
STEP 19
Hang them back up! I decided not to paint the backs of mine but you totally could. Just be sure to paint the backs FIRST so you don’t get drips onto the fronts that you’ll see.
Our hinges are hidden inside the cabinets so I didn’t have to worry about those, but if you want to freshen those up too just give them a coat of spray paint and you’ll be good to go.
We were adding new hardware that wasn’t going to line up with the old ones so I covered the old holes with the trim and we drilled new holes in once they were hanging back up.
This could easily be done in a weekend, but for us it took a few weeks. We have a butt load of cabinets in our kitchen and I was only able to work during nap time and after Eloise went to bed and some days I just couldn’t make time.
I still can’t believe how much of an impact this has had on our updating our kitchen. It definitely is a lot of work but it’s totally worth it in my opinion. Painting alone can make a big difference but the trim takes them to another level and helps modernize them even more.


I hope this tutorial of how to paint and add trim to your kitchen cabinets was helpful! It’s a super effective and cost saving project if you’re saving money for a bigger reno or just need a refresh. You can also see how I painted our backsplash to brighten things up even more in this space!


Laurissa
What grit of sand paper did you use for the initial sanding?
brepurposed
80 grit!
TR
Did you have any issues with the hinges? By adding the trim, did the hinges have to be adjusted so they open and close properly?
Alana
Am about to embark on the same adventure! noticed you didn’t caulk around the inside of the trim once glued to the doors. I’ve seen others do this, do you wish you had? Or did the glue do a good enough job to make sure there were no gaps?
And last question, do you think it would look just as good with trim 1/8” thick? I have to keep mine that thin so I can still open the doors! Tight space 🙂
Thank you for sharing!
brepurposed
Caulking would have helped! I would probably include that if I did it again! And 1/8″ will be fine!
Alana
Thanks!
Heather E Smith
What grit sandpaper did you use to sand after your primer?
brepurposed
220!
Tori
Quick question, we have the same exact cabinets and I’d like to get started on this project. I have the paint kit already, just trying to figure out the wood trim and cabinet hardware. I went to Home Depot today and they said that if I put wood trim that was 1/4 inch thick (like listed above), if we drilled handles into the trim, the wood trim would split. Did you encounter this issue at all? I hate talking to people at hardware stores because everyone has a different opinion on what works and what doesn’t!
brepurposed
Hi Tori! We didn’t have that problem at all 🙂 The wood trim sits on top of the actual cabinet so between the two it’s plenty thick to drill into. Hope that helps!
Cassie
How did you remove the drawer fronts I cant seem to get mine to come off?
brepurposed
Ours were just screwed in but yours may be different!
Jess
Hello! Your cabinets are beautiful! I am hoping to tackle this but have a few questions. Is it okay to sand the current laminate? I am concerned that I may have issues or completely ruin the door face if I do so since it’s basically a plastic. Second question, how are the cabinets holding up? Thanks so much!
brepurposed
Hi Jess! Yes you can sand the current laminate I would just use a light grit sand paper – nothing too rough. And they are holding up great! I have touched up some minor spots here and there but overall they have held up really well!
John
Wow! what a transformation and so simple to do, I’l going to show this to my wife, hopefully we’ll get a project we can complete together which won’t cost a whole lot but will transform our quite dated kitchen!
I love how your’s turned out, thank you for sharing!
Richa Verma
Great points and just what I needed to know. I just moved into this new home so I’m finding a way wherein I can redecorate everything according to my budget. Anyways, thank you for sharing them. Cheers!
Alexis
This is incredible, Bre! It’s amazing how much bigger the room feels after being painted a brighter color…. If I didn’t live in an apartment, you best bet I’d be refinishing our ugly “honey oak” monstrosities just like this! (also if this is showing up in all caps and coming off super excited/aggressive, I don’t know what’s wrong with my keyboard because caps lock is Most definitely not on lol)
Garry @ Best Band Saw
WOW!! What a great transformation. Looking amazing. Your hard work paid off.
Thanks for sharing @ brepurposed
Julie
Bre, what an awesome job you did. Your work is beautiful and your directions are so straightforward and easy to understand. You need to have your own show on DIY or HGTV. I love reading your posts. Your house is turning into a masterpiece!!
brepurposed
Aw you are too kind, thank you!!
Amy | Delineate Your Dwelling
BRE! I think we have the same exact cabinets in our new house!!! And I would love to redo the entire kitchen but know that’s not possible right now. I was trying to see if I could paint a portion of them but with being laminate (and crappy) I wasn’t sure if I could. BUT, it sounds like you did without any issue. I also have the same plastic handles it looks like you all had.
brepurposed
No way!! That’s so funny. You definitely should update them, it makes such a huge difference!!
Pat M.
I’ve been painting my old “oak” kitchen cabinets. Have the doors and drawer fronts all finished but have the boxes yet to finish. Did you find, as I have, how convenient it is to have no doors on the cabinets? I wouldn’t leave them permanently as open shelves because I have too much stuff and not enough “pretty” things to display, but I must say I love being able to just reach and not having to open a cabinet door every time I want one thing. As soon as I finish the boxes, the doors go back on.
You made a major improvement with just paint and a little trim. Paint is amazing.
brepurposed
Ha it was really nice to have everything readily available! Although it looked like a hot mess!
Jill
Wow!!!! It Oran’s even look like the same room! So much brighter!
brepurposed
Thank you Jill!!
Alice
Didn’t you encounter a problem with being able to open the doors once the trim was in place? I’d be interested to know the details on how you overcame that. But it looks bloomin’ brilliant!
brepurposed
Thank you Alice! I’ll be sure to add this to my post, thanks for the reminder! The only ones we had trouble with were the two corner units with the folding doors. I just had to glue the trim down about 1/4″ in instead of flush with the side of the cabinet. You can hardly notice!
JoAnne
Can you explain this a little further? I’m not sure I understand. I will be tackling a similar project soon and was concerned about this. Thanks in advance! By the way, this came out so beautiful!!! It gives me hope that kitchen can look half decent with a little work! Thank you!!!
brepurposed
Hi JoAnne – if you add the trim all the way to the edge, there isn’t room for the doors to fold at a 90 degree angle. So we made the inside panels about a quarter inch shorter so they didn’t go all the way to the edge. You can’t even notice! Let me know if that still doesn’t make sense and I can send you a picture.
Candice
I’m just a few years late, but I’d love to see this picture if you still have it ????
paula
Stunning transformation! Love, love, love the pulls and knobs!
brepurposed
Thank you Paula!!
Kristi
What a difference Bre! It looks absolutely amazing! All that hard work paid off in spades my friend!!!
brepurposed
Thank you so much Kristi!!
Tonia
These look great! I stumbled upon this while tackling my own laminate cabinets. I’m not sure if you’ll see this, but I was wondering how the glue is holding up all this time later
brepurposed
It’s holding up really great! Very few minor touchups have been needed!
cgloss
Beautiful! Where did you get the gold hardware from?
brepurposed
D Lawless Hardware
Leah
Hi there, these look incredible! What a transformation. If you don’t mind me asking, I was wondering if you could give me an estimate of how much this cost you? I recognize it will be different for every kitchen depending on the size/number of cabinets.