• Home
  • Shop Our Home
    • Shop Our Home
    • Amazon Shop
  • About
    • Meet Bre
    • FAQs
    • Disclosure
    • Design Shop
  • Project Gallery
  • Design Services
  • Popular Posts
    • How to Paint Your Tile Backsplash
    • How to Add Trim and Paint Your Laminate Cabinets
    • Modern Vintage Bathroom Reveal
    • Modern and Vintage Boy’s Nursery Reveal
    • How to Build a DIY Leaning Ladder Shelf
    • DIY Modern Step Stool
    • Where to Buy the Best Faux Fiddle Leaf Figs for Under $100
    • Best Place to Buy Throw Pillows
  • Contact

brepurposed

You are here: Home / DIY Home Decor / How to Install Wood Planking on a Bathtub
DIY Home Decor, Home Decor, How Tos, Inspiration

How to Install Wood Planking on a Bathtub

05/31/17

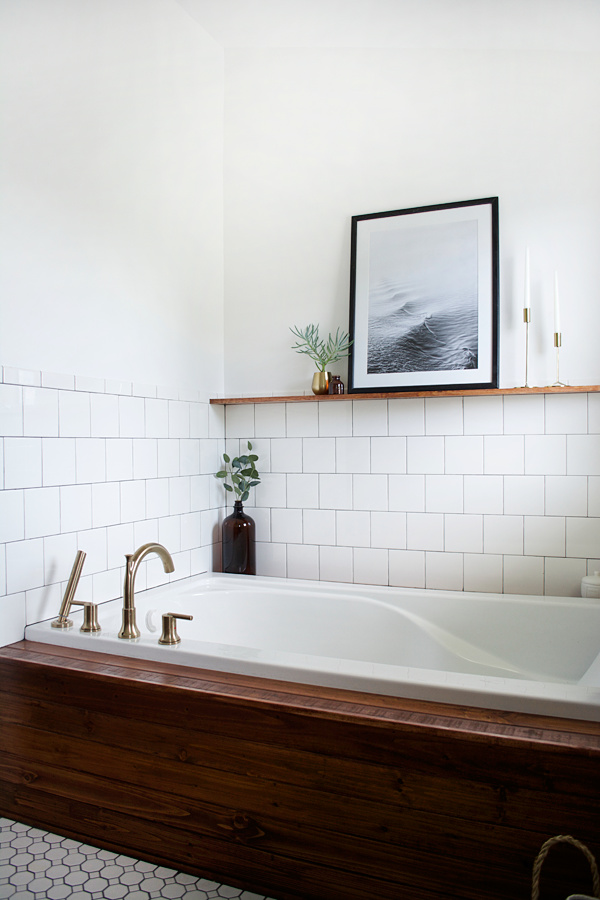
I was really torn about whether I should get a drop in tub or a free standing one but when I saw some pictures of gorgeous wood planking around a bathtub, my mind was made up. Drop in it was! And I couldn’t be happier with my decision. With so much white in our bathroom, I needed some large areas of wood to contrast against those lighter areas. I’ve gotten a lot of questions about how we added the planking, what we used and how we sealed it so I’m going to share all those details with you today and show you How to Install Wood Planking on a Bathtub!

HOW TO INSTALL WOOD PLANKING ON A BATHTUB

How to Install Wood Planking on Bathtub

What You Need


*affiliate links included
Knotty Cedar Edge V Planking
1/2″ Plywood
Stain
Tung Oil
Nail Gun

I’m not going to go into too much detail about building the frame for the tub because our contractor did all of that, but here’s what it looked like before added the planking.

Wood Planked Bathtub

So your first step is going to be adding plywood to all the areas where the planking will go. So we added a large piece on the side of the tub as well as two smaller pieces on the top on other side of the opening.

How To Install wood Planking

Then you’ll want to cut your cedar planks to size. We used these ones from Lowe’s and they were 8 ft. long but our tub was only 6 ft. long.

Wood Planking Install

Next you can start nailing your planks onto the plywood. Try and get them in the studs as much as possible and add reinforcements along the way. The tongue and groove of these were kind of a pain in the butt to get together since they’re so thin so just be patient if you use these specific ones.

I did a lot of research on what type of wood to use and ended up going with cedar since it’s a water resistant type of wood already (even though you still need to seal it) and I just happened to find these planks at Lowe’s so it was perfect. But basically you could use anything as long as you seal it well, which we’ll get to in a bit.

Installing Wood To Bathtub

Once your planks are all nailed in then you can stain. We used Red Chestnut to match everything else in the bathroom.

Red Chestnut Wood Stain

It has just the tiniest hint of red which was what I needed to closely match the vanity.

Something we added before we sealed the tub was some corner trim where the top and side planks meet. We knew we were going to need something since it wasn’t a clean edge but didn’t figure something out until after we stained. You could (and should) add this before you stain to make things easier. And I just used some wood glue to secure it. You’ll see some up close pictures of it below.

Now to seal the wood, you need something that will protect against water and moisture. I did a ton of research and at first we were going to go with Waterlox. I even bought some but then the more I read up on it, the more potent I realized it was and I’m pregnant so that was a big no no.

Even if I wasn’t the one doing it, since the bathroom is in our bedroom, I basically wouldn’t be able to be in there at all and it takes 24 hrs. to try between coats. But if you wanted to stain and seal your wood BEFORE you nailed it onto the tub – or aren’t going to be home much during your project, then Waterlox would be a great option.

We decided to go with Tung Oil though instead. It’s all natural and gives you the same results. We applied 4-5 coats and it has a much less smelly odor than Waterlox does. Also, you can find this stuff in the hardware store whereas you have to order Waterlox online.

Tung Oil Finish

After a few weeks of using the tub, this stuff has held up awesome. The water just beads right off of the wood. I’ll definitely keep you updated and let you know how it holds up long term but so far we’re super happy with it!

How to Install Wood Planking on Bathtub

You can see the corner trim piece we added here.

MCM Bathtub Remodel

DIY Wood Planked Bathtub

I love the warmth that the wood adds to the space and it totally makes it feel like a spa! If you’ve ever wanted to add wood planking to your bathroom, here’s your moment. There are some great options that will help protect your wood and help turn your bathroom into a dream space 🙂

How To Install Wood Planking on Bathtub

Related

9 Comments

Comments

  1. Gina says

    July 31, 2020 at 12:01 pm

    Can you link the corner pieces or did you make them out of the existing planks?

    Reply
  2. Laura says

    May 14, 2020 at 4:27 am

    Thank you so very much for your blog post – I love your bath and will be trying to create the same effect in my new bathroom – this is so helpful! 🙂
    Laura, (UK)

    Reply
  3. Aaron C. says

    September 7, 2017 at 12:44 pm

    The hardest part of putting a tub in is getting it level. I remember taking several tries to install a new tub. Talk about a nightmare! Thanks for writing!

    Reply
  4. Bre says

    July 30, 2017 at 4:38 pm

    Did you use the same sealer on the wood vanity as you did on the wood bathtub? How is the wood vanity with the sink holding up? I’m considering doing a butcher block vanity top in a bathroom remodel and was curious what you suggested for that? I’ve heard good things about Waterlox for sealing as well..

    Reply
  5. Tiffany says

    June 2, 2017 at 9:46 am

    This is gorgeous!! You did a great job!

    Reply
    • brepurposed says

      June 2, 2017 at 11:51 am

      Thank you Tiffany!!

      Reply
  6. Offrs says

    June 2, 2017 at 3:22 am

    Such a beautiful bathtub! I love it!! Thanks for sharing <3 <3

    Reply
    • brepurposed says

      June 2, 2017 at 11:51 am

      Thank you so much!

      Reply

Trackbacks

  1. This & That - Pics and Pastries says:
    June 2, 2017 at 9:57 am

    […] don’t think it’s possible to love this bathtub anymore than I […]

    Reply

Leave a Reply Cancel reply

hi I’m bre! follow along as we renovate our current home and share modern DIY ideas.

  • Facebook
  • Google+
  • Instagram
  • Pinterest
  • RSS
  • Twitter

Shop My Faves

More forsythia spam because they bring happiness t More forsythia spam because they bring happiness to any room 😍 our bush is already almost green but they sure are pretty while they last! It was about a year ago that we were getting ready to rip out this bathroom and start demo. The last bathroom in our home that needed updating and I had so much fun designing it! You probably wouldn’t know it was a kids bathroom but I’ve always been a huge believer in not having to sacrifice beauty when designing spaces for my kids. I love the challenge of keeping it in line with my aesthetic while still making it functional and fun for them. But I did put their toothbrushes away for this pic 🤪 happy hump day! #breinspired
I look forward to our forsythia blooming every spr I look forward to our forsythia blooming every spring so I can cut some branches to bring inside 😍 this little vignette is bringing a smile to my face today! And so is my newly planked porch ceiling 🙌🏻 have you been following along in stories? Today I’m going to figure out what color to stain it! Happy Friday friends 🤍 #breinspired #freshblooms #springhassprung
HAPPY EASTER! He is risen! 🙏🏻🙌🏻 enjoy HAPPY EASTER! He is risen! 🙏🏻🙌🏻 enjoy this glorious day my friends 🤍 #eastersunday #bertolinifamilyoffive
Happy Friday from Puffball the Pothos and Banana Happy Friday from Puffball the Pothos and  Banana Sugar Plum the Button Fern 😂🌿I asked Eloise to name my new plants for me and she didn’t disappoint. I’ve watered them TWICE already since bringing them home which you know is a big deal for me 🤣 they may actually survive 🤞🏻still totally clueless on what color to paint our house but I think I found a solution for our vinyl windows! Will be sharing in stories today for anyone else with the same problem!
THIS MIRROR 😍 I swear it looks good anywhere, i THIS MIRROR 😍 I swear it looks good anywhere, in anyone’s home, no matter your style. And It’s sitting here on my little antique entry table because I’m an #anthroambassador - pinch me! Walking through an @anthropologie store is an experience that hits all your senses in exactly the right spots. And makes you want to buy all the things you never knew you needed 😂 they have a way of creating an aesthetic that appeals to everyone and I’m so excited I get to share more of this amazing company with you guys that I’ve admired for so long! #anthropartner #anthroliving #myanthropologie
Just over here obsessing over the plans @yardzen c Just over here obsessing over the plans @yardzen created for our exterior makeover! 😱😍 our back deck is in desperate need of an update and I’m so excited to be tackling this project this year. You guys know I love making a mood board/mock up before starting a project but these are on a whole different level 🙌🏻 they totally brought my vision to life and were so awesome to work with. And they just launched in Ohio this month! I’m getting ready to start ordering some materials and can’t wait to turn these plans into reality 👊🏻 oh and check in to stories later today to find out if my FIL is on board with painting the house dark! 😬
Sometimes you just need to call in a pro to get th Sometimes you just need to call in a pro to get the job done 💡 I’ve been wanting sconces above our couch for a while now and decided to finally do it! The only lighting we have in here is overhead so we’ve lacked that cozy night time glow while watching tv, reading a book or just hanging. So not only are these pretty but they’re practical too - good lighting is a total game changer and I’m all about setting the right mood for a space. Totally worth hiring an electrician to make my sconce dreams come true! 😍
My little peanut. Clocking in at a whopping 6% on My little peanut. Clocking in at a whopping 6% on the weight charts 🤣 All my babes have been small and I’ve talked about my breastfeeding struggles before. Dilly had her 6 month check up yesterday and even though her numbers aren’t where they “should” be she’s perfectly happy and healthy. And as a mama, that’s all I can ask for. I know she’s all good, even if I’m constantly doubting my supply. This was around the time I stopped nursing with Hawk & Eloise but it feels different this time. And she won’t take a bottle so there’s that too 🙈 So as long as I am still nursing I’m continuing to take my postnatal @ritual vitamins. They’re filled with 15 traceable nutrients to help support this postpartum stage which I love as a nursing mama. Plus they are easy to take and minty fresh! And I love their clean, vegan-friendly formula. They are a great reminder to take care of myself so I can take care of her 🤍 use code BREPURPOSED10 for 10% off your first 3 months! #ritualpartner

POPULAR POSTS: DIY LADDER SHELF | PAINTING TILE BACKSPLASH | HOW TO INSTALL WOOD LOOK TILE | PAINTING LAMINATE CABINETS | HOW TO REFINISH A DRESSER | DIY STEP STOOL | FAUX FIDDLE LEAF FIG TREE | BEST PLACE TO BUY THROW PILLOWS

PRIVACY POLICY

© Copyright 2021. brepurposed. All Rights Reserved. Designed by Oh Wild.