Alright, you guys have been waiting for this ever since I shared our Master En Suite Reveal and I finally got the post together to share with you! I’ve had my eye on these types of shelves for a while now but they usually cost between $200-$300 or more. So I figured I’d just make my own and it really was super easy! So if you want to make your own DIY Leaning Ladder Shelf you totally can!
DIY LADDER SHELF

This is the inspiration photo I found that I based my leaning bookshelf design off of which you can buy for almost $300. No thanks.

SUPPLIES FOR DIY LADDER SHELF
(affiliate links included)
Two 1 x 4 x 6 pine boards
Six .5″ x 2.5″ x 3ft. pine boards
3/4″ plywood cut into the following measurements:
— 4.5″ x 22″
— 6.75″ x 22″
— 9″ x 22″
— 11.5″ x 22″
— 14″ x 22″
3/4″ trim for the front of each shelf
I used this chop saw for all the cuts on this project.

STEP 1
Cut your plywood to size which will be used for the wooden shelves. We had some extra plywood laying around that we cut ourselves but you could buy a half sheet from the hardware store and have them cut it for you if you need!

STEP 2
Cut the pieces that will be the trim on the shelves. One piece along the back and two on the sides. I just placed it on the plywood, marked the end with a pencil and then made the cut. I cut mine so that the back piece went across the whole length (22″) and then the side pieces started in front of that.

STEP 3
Glue the back piece only to the plywood. I used DAP Rapid Fuse which is my go to wood glue.

STEP 4
Cut your 1x4s on the bottom at a 10° angle.


STEP 5
Once your shelves have their back pieces glued down and are dry – it’s time to attach them. We used our nail gun and put two nails on both sides for each shelf. This is a two person job so make sure you have help! I tried doing it by myself first using glue to hold them in place until we nailed them but it was a HUGE FAIL. So just ask for help 😉
Also make sure you use a level so your shelves are straight. Have one person hold the shelf and the other person use the nail gun.

And then you’ve got this!

STEP 6
Place the side trim pieces on the shelf where they’re going to go. Grab a pencil and make a mark (that will be at a slight angle) and then make your cut. Then glue them down!

Once all your pieces are glued down your leaning shelf should look like this:
Side note* this is where you would glue on your trim pieces as well. I ended up staining my shelf first to see if I liked the way it looked but the plywood layers were still peeking through so we glued the 3/4″ trim on right over the plywood only on the front of each shelf and then stained it the same color. You can see a close up further down!

STEP 7
Stain and poly! I used Red Chestnut which isn’t usually my norm (I’m more of a dark walnut or special walnut kind of girl) but the vintage sideboard I got to use for our vanity had a little hint of red to it and this was the closest match I could find.

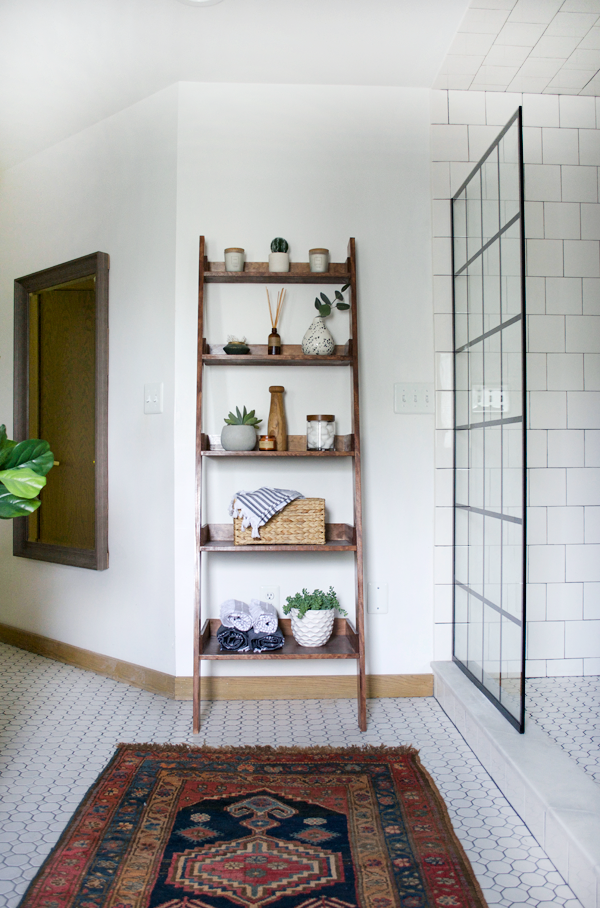
Once dry – you’re ready to use your ladder shelf! Here’s a side view so you can see where the nail holes are. Super small and not very noticeable and those two little nails on each side are all you need.

And here is a close up of the trim I added on the front of each shelf on my new leaning ladder shelf.


I’m so glad I decided to DIY this wooden ladder bookshelf and not pay for one, it was super fun to make and gave me the perfect spot for some additional storage and pretty decor.
If you’re looking for an easy beginner builder project – you should totally try this DIY Leaning Ladder Shelf!


Willian Werneck Carvalho
Really dumb question that I don’t think I saw a mention. Did you screw them into the wall so it doesn’t slide down?
Rich
At what height do you attach the shelves?
Ryan
do you think the bottom 2-3 shelves would be sturdy enough with 4 nails to hold cast iron cookware or stoneware? Its a little heavier, but contemplating making one of these instead of making a buffet. Thanks
brepurposed
I definitely think it would be ok. You could always add some brackets underneath to add a little extra support!
Anna
Is there a way to make the ladder with shelves taller? My husband is making it for my daughter and she has high ceilings .we are thinking 8ft ..thank you!
brepurposed
You definitely could! You’d just need to use different measurements
Dustin
This looks awesome! What distance spacing did you use between the shelves?
Ali
Bre, this project is so great! Do you remember (or can you estimate) what your total cost ended up being to complete the project?
brepurposed
Thanks Ali! I don’t remember exactly but it was definitely under $100!
ninjaDIY
Hey Bre … this is such a nice little DIY project. I loved it.
It looks very nice and stylish and as well it adds functionality to that little corner of your home.
I really liked the finishing, it looks high end 🙂 really well done!
Thanks for Sharing
Adrian
Brooke
This is lovely! Do you care to share the final dimensions, please?
Lisa
I’m so happy to see a diy for this. I too keep noticing these in the store but they’re so expensive. You did a great job.
Also, I’m totally jealous of your shower area. One day I’ll have a house big enough for something like that.
Claire Anderson
Very, very, very clever! I love saving big money on things and what a huge saving you made…I might even try some construction now. Cheerio
brepurposed
Thank you Claire! It always feels good to save money!
LouAnn
That is fantastic! Thanks for the directions! So… did you anchor it to the wall before putting items on it? I’m wondering if it feels like it could slide down???
brepurposed
Hi LouAnn! Nope, it didn’t need to be anchored…the backs of the shelves are all flush with the wall and it’s totally stable!
Jo
That looks really great! You’re house looks amazing! I have been curious, why did you decide to leave the baseboards and doors wood throughout the house? I would have painted those white in a heartbeat.
brepurposed
Thanks Jo! I definitely thought about it but ALL the trim, doors and windows are wood and would be a huge undertaking to paint. The windows can’t really be painted due to the way they are (it would be more than just a frame) and we aren’t planning to replace them anytime soon so I wanted to keep everything consistent for now 🙂
Deidra
Obsessed! This is my new inspiration room! Thanks for sharing!
brepurposed
Thank you so much!
April
Thank you. This might be on my to do list during Mem Day weekend.
brepurposed
Awesome! It’s a super fun project!