You guys have been asking and asking and I’m finally dishing all the deets on the wood wall in our laundry room! It was definitely a labor of love but actually a lot easier than I thought it was going to be.
I knew I wanted something unique above the floating bench and after tons and tons of research and brainstorming I got the perfect idea and was determined to make it come to life. The laundry room was definitely a group effort between me, Dan and my FIL but this piece was something I made all on my own, and I’m pretty freakin proud of it.
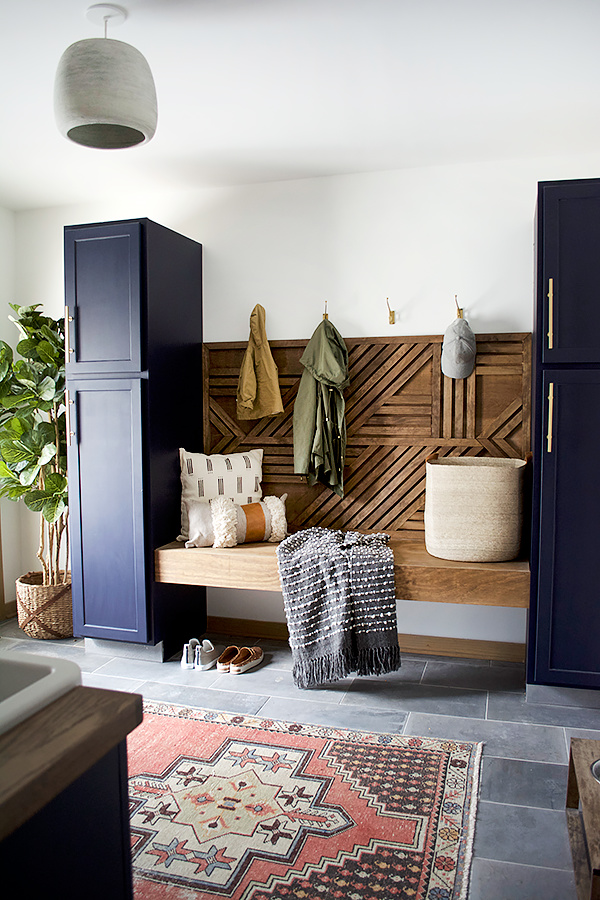
DIY Geometric Wood Feature Wall with Floating Bench

Like any good project, it all started on Pinterest where I found this image from Bells and Whistles. Hellllooo gorgeous.

As soon as I saw it I knew this would be my inspiration. Now, I just had to figure out how to make it. I was chatting with some of my bloggy friends and telling them my idea, and one of them shared this post with me from Mandi over at Vintage Revivals.
Goddess of all DIY. I love and follow her but somehow missed this post. It was essentially the same concept for what I wanted to make and as I kept reading, I realized she was inspired by the same exact space, just a different photo. Turns out I was just a year and a half late to the game 😉
SUPPLIES FOR FLOATING BENCH
*affiliate links included*
3/4″ plywood
Stain – I used Special Walnut and Golden Oak
Poly
2x4s
Brackets
Measuring Tape
Level
Black Foam Brushes
Let’s start with the bench first and then I’ll get into the feature wall above it.
STEP 1
I bought a piece of 3/4 inch plywood from Home Depot and had them cut it to the size we needed for the top of the bench. Then I also had them cut another piece from the same board that was the same length and about 6 inches wide.

STEP 2
Stain your wood. This is the magic combo of stain I used for this whole project. I applied the Special Walnut first and then the Golden Oak and then another light coat of the Special Walnut.


STEP 3
Once that was dry I applied a couple coats of Poly.

STEP 4
To install the bench you want to measure up from the floor how high up the seat will be. Make a few marks that you can connect with your level
STEP 5
For the back wall we used a 2×4 for the support and used a level to make sure it was straight. Then we screwed a few screws into the studs.

For the sides, since we were screwing into the cabinets (which are laminate and not real wood) we used some smaller pieces.

Because the laminate might not have the strongest hold, we used some nuts and bolts to give it some extra support.

STEP 6
If your space was smaller and this was going to be more of a bench for show, you could just put your one piece of plywood on top of your supports and be good to go, but since this bench was actually going to be used a lot, we needed it to be strong. We had another piece of plywood left from the board they cut for us that we put down first.


STEP 7
We put the stained piece on top of that and it was still pretty shaky and sank pretty bad in the middle. So we decided to lay a couple 2x4s across it as well.
STEP 8
We drilled those into the existing supports and then laid the stained top down. Then we used these brackets so we would have something to screw the front piece into. We used four all together.

STEP 9
Once those were screwed in, the front piece was pretty secure but we used our nail gun to shoot a couple extra nails in there on either end to make sure it stayed in place.

Luckily we didn’t have any vents or anything underneath we had to worry about, but if you had something like that or a radiator you had to build around this post on How to Build a Radiator Window Bench is super helpful!
So if you just wanted a floating bench, there ya have it! But that bare wall was just screaming for something, so let’s move onto my pride and joy.
SUPPLIES FOR GEOMETRIC WOOD FEATURE WALL
1/2″ or 3/4″ Plywood
1x2x8 Select Pine Boards
Stain
Poly
DAP Rapid Fuse Wood Adhesive
Miter Saw
Black Foam Brushes
I started out with plywood for this one too, but this time it was 1/2″ thick. Looking back 3/4″ probably would have been better, since it got so heavy once all the wood pieces were glued on, but it still worked just fine.
So I had my plywood cut to the size I wanted and then had to figure out what type of wood I was going to use to make the pattern. I think I was in Home Depot for about 2 hours that night ha. I even had my cart loaded up with thin pieces of poplar planks that were super light weight and would have worked great. But poplar has a weird yellow tint to it and they all kind of varied in color and I was scared they wouldn’t stain well. So I took those back to the shelf, and kept staring at more wood.
I ended up going with these 1x2x8 pieces of select pine. I bought 15 which was a total guess but ended up being the perfect amount.
Before I started building I planned out my design in Illustrator. Honestly, I just kinda winged it and played around with different patterns. I started with the two symmetrical triangular designs on the ends and then went from there. We didn’t worry about angles at this point, I just needed something to work off of.

I printed this out and brought it outside with me so I had it on hand for easy reference. Then I got my pine boards, plywood and miter saw ready to go. I made all my cuts with this guy and they were all either 90° or 45° which made things pretty easy.


First things first was drawing two lines on the plywood marking the horizontal and vertical center to work from. Then I framed the plywood.

Then I started with the triangle pattern on one side. Start with one piece, and then grab another board and mark it’s size with a pencil so you know they’re the same. This will help give you a guide for where to cut and know what angle you need. I used a scrap piece of wood that was a littler smaller than an inch thick to measure the spacing between each board.

Once this side was done, I measured each of these pieces against a new board and made pencil marks, so I could easily replicate the same design for the other side.
I wasn’t gluing my pieces as I went since I wanted to see how it all looked first, which was actually a good idea because I was able to use pieces as guides to replicate when I needed more than just one of the same size.

Once I did the other side with the triangles, I placed one long board straight down the middle which gave me the perfect piece to work off of. Then I just started adding in the rest of the boards, using my design I created as a reference.

Once you get in a groove it goes pretty quickly. And it’s so fun seeing it all come to life. I honestly had no idea how it was going to turn out. But once I started working, I got super stoked when I realized my idea was actually going to work and it was looking really cool.

I probably finished all the cuts in about two hours which was wayyy faster than I thought it was going to take.

At this point nothing was glued down and I moved it into our garage to work on the next day. Probably the most productive nap time I’ve ever had ha. Eloise was cooperating that day 😉
Ok so the glue I used is amazing. And if you have a wood project coming up you have to use it. I discovered it at Haven this past summer and was blown away by it. It dries so fast and holds so well. It’s by DAP and it’s their Rapid Fuse Wood Adhesive. I still used some small clamps along the way as I glued everything down, but only needed to leave them on there for a minute or so to make sure it bonded. I started with the frame along the outside and then did my triangles on either side and the long piece across the middle to make sure everything was centered and lined up from there. A couple pieces ended up being a little too short or too long so I adjusted them and luckily had a couple scraps left over to make new cuts.

Be careful your glue doesn’t glob out from under the boards. It dries super fast and it will look discolored when you stain over it.
Once they were all glued, I went right into staining it. I found that using a couple of different sized black foam brushes was the easiest way to get into the crevices.

After some special walnut and golden oak I gave it one coat of poly and let it dry overnight. Then it was time to bring this baby inside! It fit like a glove, thank god. We used the nail gun to put about 4-5 nails into the studs. You can hardly even see them but they were just enough support to hold it up against the wall.
I seriously couldn’t be more in love with it and have already been plotting more ways I can use a similar pattern/treatment somewhere else in our house. It gives our laundry room that unique touch I wanted and it’s even better knowing I made it all myself.


And don’t forget to check out the rest of our laundry room makeover if you missed it! I know that was a lot of info. So if I missed anything or didn’t explain something well, let me know!


Michael Graves
My wife and I just finished this for our entry way. Can’t thank you enough for the idea and walk through!
brepurposed
Yay! I’m so happy to hear that!
Scott Jackson
Awesome Job!! Ours is in progress now. Just wondering what the measurements were on your wall piece?
Jacob White
What size did the plywood end up being?
Lesley
I agree, what was the end dimensions??
Scott W Jackson
I’m also wondering. What size plywood did you guys go with in the wall?
Emily
Did you sand before you stained the back piece? It seems hard with them glued down…Also, did you wipe as you stained or just brush on without wiping off?? Hope you can help!
brepurposed
I did not sand the back piece, it wasn’t needed. I should have stained it first but I did not. It would be easiest to stain the back first and then attach the rest of it. You don’t need to use a lot of stain, so I only wipe down small amounts that glob up if needed!
Emily
Thanks! I finished it and it is on display in my entryway! I love it, thanks for the tutorial!
kutticouture
This is insanely gorgeous!! Phew!!
Leina
This is so great! I can’t wait to try something like this out. When this was finished, what were the dimensions of the back piece?
Malia Young
Hi! What size boards did you do for the side supports on the floating bench? 2x2s? Thanks so much! Looks AWESOME!!!
brepurposed
We used 2x4s!
Malia Young
Step 5 says you used “smaller pieces” for the cabinet sides than the 2×4 on the back support. Also, adding the extra plywood and 2x4s on the bench top, how tall is the final bench top?
Breanna Bertolini
Oops sorry! Yes they were some scrap 2x2s we had left over. Total bench height is 23″ 🙂
Britney Coyle
I have literally been searching for months for inspiration thanks to you I finally have it! what color did you paint the cabinets?
brepurposed
So glad you stumbled upon this! The cabinets are Anchors Aweigh by Sherwin Williams 🙂
Becca
Love this so much. So creative and fun. Where are the tall cabinets from? I didn’t see that when reading through. Thanks
brepurposed
Thank you! They were actually sized wrong on a job my FIL was working so he got them for super cheap for me!
Jenni Adamson
Where is the rug in your laundry room from? My husband and I are going to attempt your bench!
brepurposed
Oh yay! Let me know how it goes ???? it’s from UrbanRug, they’re on etsy!
Debbie C
I followed a link on Centsational Girl and found this gorgeous laundry room. I love it! And this wall piece…I have to try this somewhere. Really stunning. Can’t believe you did it all in one naptime!
brepurposed
Aw thank you so much Debbie! So glad you stopped over. The wall went surprisingly quick once I got started!
marieke
Looks really really cool! Where is the amazing pillow from??
brepurposed
Thank you so much! It’s from Marshalls 🙂
Sam @ DIY Huntress
I have literally been drooling over this bench since the moment I saw it on your IG. I cannot wait for my other half and I to have our own space to build this. Thank you for sharing this beauty!
brepurposed
Aw thanks girl!! So glad you love it!
Kendra
We really love what you have done here. Very impressive! A truly unique addition to any room. Also,
the entire VintageStyleLiving.com staff loves your blog! Thanks for sharing!
brepurposed
Aw thank you so much, that’s so sweet of you!
JOYCE DZ
I sent these instructions to my husband since I am not as handy as you are. Thank you so much!
brepurposed
Yay! Definitely let me know if you end up making something similar!
Cyd
I honestly love this so much and have since your sneak peeks on Snapchat. (It was Snapchat, right? haha) Still trying to figure out where in our house to put something like this because I loooooove it that much.
brepurposed
Aw thanks girl!! I’ve been thinking of where else I could put another one too! 😉
Andi
Love it, thanks for the tutorial!!
brepurposed
You’re so welcome, Andi!
Jessica | househomemaDe
It’s so beautiful!!
brepurposed
Thanks so much girl!
Pat M.
Probably the best laundry room on the entire Internet full of laundry room ideas. You’ve done a great job and I can’t wait to see what you do with the rest of your home.
brepurposed
Aw you are too kind. Thank you so much, Pat 🙂 Excited to get into lots more renovations this year!
Kristi
One of my very favourite things about your new laundry space – this wall is absolutely incredible my friend!!!
brepurposed
Aw thank you so much Kristi!! I just love walking in there and knowing I built it!
Kathy
This is gorgeous. I’ve been thinking of trying something like this for a headboard. I’m a little confused by this statement……”I started out with plywood for this one too, but this time it was 1/2″ thick. Looking back 3/4″ probably would have been better, since it got so heavy once all the wood pieces were glued on, but it still worked just fine.” The 3/4″ would be heavier than the 1/2″. You’re given me the push to figure out my headboard!
brepurposed
I’ve often thought about it as a headboard too! So what I meant by that statement was that with the addition of the wood, it made the whole thing heavier but since the plywood was only 1/2″ thick it was a little wobbly. Since we nailed it to the wall it didn’t matter too much but 3/4″ plywood would have made the whole thing much sturdier, especially if it needed to stand on it’s own. Hopefully that makes sense! 🙂
Kathy
Haha. Makes sense to me now. I thought that you were just talking about the weight. So when you said it was so heavy, so next time you would use the heavier plywood, I just didn’t get it. 🙂 /lol thank you for answering,!
brepurposed
no problem! sorry it was confusing!