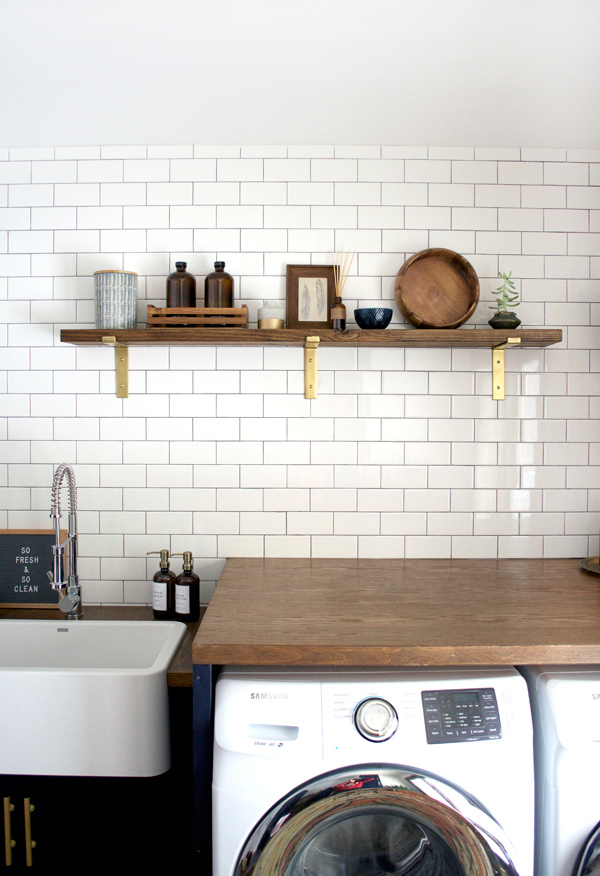
When I started planning out the laundry room, I knew I wanted some open shelving above the washer and dryer. It was going to be more for decor than anything practical, and the most important thing I had to figure out was the type of shelf I wanted and how we were going to hang it. I couldn’t be happier with my decisions so today I wanted to share with you all How to Install and Style Open Shelving. You can apply this to any room in your house and it’s such a great way to get creative and put things on display that you love!
HOW TO INSTALL AND STYLE AND OPEN SHELVING
*this post is sponsored by Crates & Pallet. All thoughts and opinions are 100% my own.
MATERIALS
*affiliate links include*
:: shelf brackets
:: wood
:: stain
:: poly
:: drywall anchors
:: spray paint
:: drill bit
So let’s start with the actual shelf. I wanted ours to take up most of the wall above the washer and dryer and match the rest of the wood elements in the room so I made my own. So I bought a piece of 2x8x8 lumber from Lowes or Home Depot (I honestly can’t remember. I was back and forth between those two stores so much during this reno!) But both places have the same thing. I bought 8 inch wide because that’s what fit our brackets. They come in different sizes which I’ll get to in a minute, so just make sure if you’re going this route you buy the correct width, or have the tools to cut it if you have to.

Our shelf ended up being 5 feet long and we cut it at home once we had the size figured out. I gave it a quick sand with my power sander to smooth everything out and then I stained it to match the rest of the wood in the room.
I used a mix of Dark Walnut and Special Walnut and then sealed it up with some Poly.
While that was drying I got to work on my brackets. For a while I’ve been in love with these ones from Rejuvenation, but didn’t know if I could pull the trigger on the price. But when I went to Haven Conference and stopped at Crates & Pallet’s booth I fell in love with their new shelf brackets that were a fraction of the cost. I knew they’d be absolutely perfect.

They sell them online at The Home Depot HERE and come in a few different sizes. Like I said, we went with the 8″ ones. They all come in black so I gave them a coat of spray paint in my favorite brassy looking color.

They don’t come with any screws so you’ll have to buy your own if you don’t already have some. We ended up using 3 brackets and the way they were spaced wasn’t going to hit any studs so we used these anchors to ensure good support.

Start out by measuring where you’re going to drill your holes. We started with the middle bracket and marked spots right on the tile.

Now to drill into the tile, you’ll need to use a masonry bit. It can be tricky to get started, but a good tip is to use a chisel and hammer gently into the tile right over your mark. This will help the bit stay in place and give it a good starting point. Then once you drill all the way through, just plop your anchors in and screw your bracket in place.

Now even though we had the lines of the tile to use a guide, we still used a level to make sure our shelf was straight.

Once you have all your brackets in, just place your wood shelf in. Now I’ll be honest, there are holes underneath the shelf to help secure the brackets to the wood, but we didn’t even bother. Since this is a decorative shelf and we aren’t going to be picking things up off of it constantly and moving things around, we didn’t think we needed the extra support. But if your shelf is in a high traffic area, I would definitely recommend putting in those extra screws!

And since the screws didn’t match the brackets, I gave them a quick spray with the same color spray paint. You could do it before you put them in but they might get a little beat up. I just taped some newspaper to the wall around each bracket to make sure I didn’t make a mess and get any paint on the tile or the shelf.

So now for the second part of this post, which I’ll admit for me, was way harder than installing the actual shelves. Styling time! So you’ve got your beautiful new shelf all hung up but what should you put on it?! I’ve got a few simple rules you can follow that will help you create the perfectly styled shelf.
Use Items That Aren’t All The Same Height or Size
This is important for creating balance on your shelf. You don’t want to use a bunch of items that are all the same size and height and you don’t want to put items that are similar in heigh next to one another. This doesn’t mean you have to alternate every other one with something big and then something small, but try and space them out. If something feels too short but you really want to use it, you could put something underneath it to give it some more height. Try something like a book or a small tray.

Stay Within the Same Color Palette
As with any space you’re designing, color is important. It will help your shelf feel cohesive and part of the room. Think about the elements in the rest of your space. In our laundry room we have concrete, wood, gold/brass, blues and browns. And if you look at our shelf, it has every one of those things.
Plants Are Always a Good Choice
Small plants and succulents are the perfect filler items to use on open shelving. I was having trouble with the right side of our shelf after the reed diffuser. I played around with it for quite a while before I was finally happy with it and adding in that little succulent was just what it needed. Long stemmed plants (like eucalyptus) are also great for adding height where you need it. Just throw some in a vase or bottle to help balance out the rest of the decor.

Think Outside the Box
Obviously depending on where your shelf is going, you’ll have different things on it, but try and think outside the box. It was hard for me in our laundry room because I wasn’t putting anything on there that was really practical to the space (besides the reed diffuser that smells heavenly). I have a candle holder up there that clearly is never going to be used for that purpose, but the concrete and gold went perfectly with the rest of the room so I had to try it, and I loved it.
The planter on the far right is also a candle holder 😉 The big wood bowl I have up there was a last minute idea that I’m really glad I tried. Usually you think of using a bowl like that to put things in, but in this case, it worked great leaning against the wall. It was the perfect size to fill that space. Look around your house for items you already have and think about how you could use them differently. You never know what might work until you try it!

Keep it Simple & Don’t Overthink It
I know this is easier said than done. Sometimes shelves with lots of objects on them still somehow seem so simply styled right? I could have spent hours going back and forth with things on this shelf. But once I got to the point where I felt really good about it, I backed away. If I kept going, I would probably put way more things up there that it didn’t need and would make it look cluttered.
Sometimes I think I could even take one or two things off. Am I crazy? Probably. This shelf will probably get re-styled hundreds of times in it’s lifetime. At the end of the day, use things you love and things that make you happy. Don’t try and pile it high with everything you own. Have fun with it and don’t be afraid to try new things. Just don’t spend hours upon hours trying to figure it out or your husband will start making fun of you 😉
Hopefully these tips help you out if you’re planning on installing some open shelving. If you want some more tips on installing floating shelves check out this super informative post – Open Shelving Kitchen Guide.
Thank you to Crates & Pallet for sponsoring this post. All thoughts and opinions on their amazing new shelf brackets are 100% my own. Thanks for supporting the brands that allow me to keep creating!


Kristina
I have been searching for some pretty brackets for so long! This DIY is so helpful and probably the route I’ll need to go too! Beautiful job!!
-Kristina
http://www.kristinalynne.ca
brepurposed
Yay, glad to hear that! These brackets are so affordable!
Corey Willis
I so needed this! Thanks for the useful tips!
brepurposed
You’re welcome! Glad it was helpful!