• Home
  • Shop Our Home
    • Shop Our Home
    • Amazon Shop
  • About
    • Meet Bre
    • FAQs
    • Disclosure
    • Design Shop
  • Project Gallery
  • Design Services
  • Popular Posts
    • How to Paint Your Tile Backsplash
    • How to Add Trim and Paint Your Laminate Cabinets
    • Modern Vintage Bathroom Reveal
    • Modern and Vintage Boy’s Nursery Reveal
    • How to Build a DIY Leaning Ladder Shelf
    • DIY Modern Step Stool
    • Where to Buy the Best Faux Fiddle Leaf Figs for Under $100
    • Best Place to Buy Throw Pillows
  • Contact

brepurposed

You are here: Home / Uncategorized / DIY Faux Distressed Wood Backdrop
DIY Craft, How Tos, Uncategorized

DIY Faux Distressed Wood Backdrop

06/23/14

Happy Monday friends! Hope you all had a great weekend! I had a fabulous time working on some projects, spending time with a friend who came to visit and relaxing at the beach 🙂 Can’t get better than that!

So if you follow me on Instagram, you may have seen the photo I posted on Saturday of a little something I was working on. A couple of you guessed it was a headboard, which of course put new ideas in my head, but I’m here to reveal to you it’s true identity!

This post contains affiliate links.

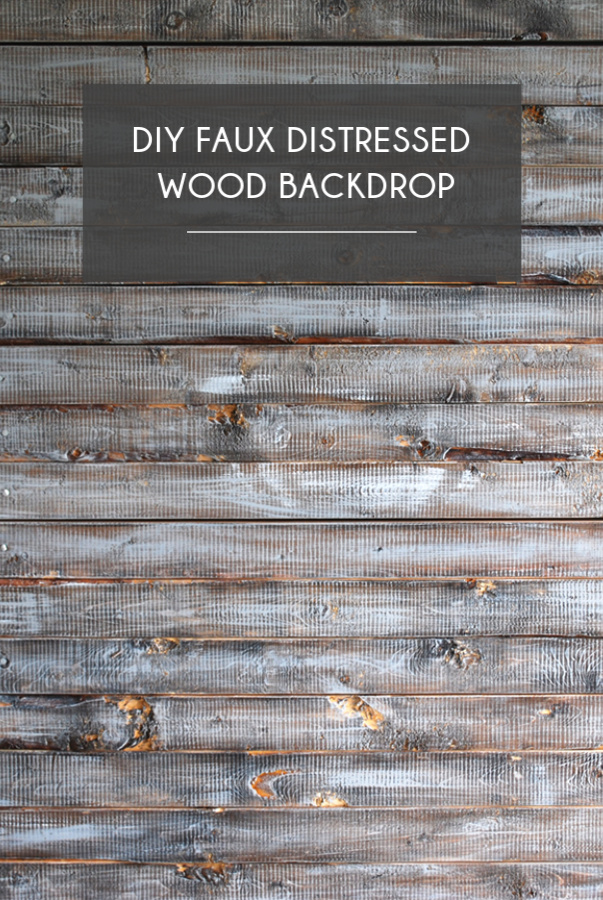
DIY FAUX DISTRESSED WOOD BACKDROP

Finished Faux Distressed Wood Backdrop

As many of you know, or if you’re new around here, we rent a little apartment with not much natural light. Our living room is also painted a not so pretty brown that I just never put the effort into painting. Honestly, I’ve never been truly happy with any place in our apartment that I stage my photos.  Yes, I’m probably being too picky, but I can’t help it!

So when my blog got it’s new look last week, you may have noticed the wooden background, which I LOVE. This got me thinking…why don’t I make a wall similar to the background and use it as a backdrop to take my pictures against! BRILLIANT!

STEP 1: GATHERING AND PREPARING THE WOOD

At first I thought about making it out of pallets. I scrounged up about 4 of them and totally forgot about how much of a pain they are to take apart. The hubs has a broken pinky right now and isn’t very useful. So, I recruited one of my friends to come over and help me.

With hammers and crowbars and a lot of sweat, we got most of the wood off of 3 of the pallets. Taking a look at the pile, I knew it wasn’t going to be enough, and really didn’t want to deal with taking more of them apart.

I’d gone to Home Depot and looked around for wood there but really didn’t see anything that would work for what I wanted. I ended up going to a local lumber yard and explained what I wanted and placed an order. I probably should have asked to see the wood first because when we went to pick it up later, I realized they’d given me 2x4s. Just a wee bit thicker than what I needed.

The hubs was not amused. I’d already payed for the wood and at this point I just wanted to get this thing built. We loaded up the car and headed home to start building!

Building Wood Backdrop

STEP 2: BUILDING THE WALL

Since this was just going to be leaning up against a wall, it didn’t need to be super sturdy. We used more 2x4s as the support beams and simply nailed the others as shown in the photo.

Pretty sure our neighbors hate us with all the hammering we’ve been doing lately. Oops 🙂 Once I had them all nailed in, we propped it up against the wall on our porch and I’m pretty certain it won’t ever move from that spot haha. This baby is HEAVY. I’ll worry about what I’m going to do with it in the winter when the time comes 🙂

Built Wood Wall Before Staining and Distressing

STEP 3: STAIN

To achieve the distressed look the next step was to stain. I used Minwax’s Dark Walnut.

Dark Walnut Stained Wood Backdrop

STEP 4: PAINT & DISTRESSING

I actually really like the way it looked stained, but that wouldn’t match my blog’s background, so I carried on. So, I grabbed some white and light grey paint that I had laying around and a large paintbrush. Using a VERY small amount of paint on the brush, I lightly brushed it on.

White Paint to Create Distressed Look on Wall

Painting Wood Backdrop

Painted Wood Wall Before Sanding

I did about 3 coats and was planning on doing some extra distressing with a sanding block, but it was just taking the paint off so I left it as is.

Finished Wood Backdrop After Sanding

And that my friends is my new pride and joy! It turned out even better than I imagined and hopefully now everyone will understand why I wanted to build a wall 🙂

It may not match my background exactly but I’m ok with that and can’t wait to have my own little photo studio. Even if it is on our front porch 🙂 Neighbors DEF think I’m a crazy person.


Related

63 Comments

Comments

  1. Paula@SweetPea says

    November 20, 2014 at 9:22 pm

    I need to put this on my “to do” list! I really like this!

    Reply
    • brepurposed says

      November 20, 2014 at 9:24 pm

      It was the best decision I ever made! 🙂

      Reply
      • Geoff says

        February 24, 2017 at 1:07 pm

        What are the rough dimensions of the wall I am trying to talk my wife into letting me build one of these for her side business.

        Reply
  2. Mary Beth|Cupcakes and Crinoline says

    July 13, 2014 at 10:13 am

    This is such a great idea and such a smart use of space! I have a small house and I’m always having to move things out of the way for pictures. I am adding this to my ‘must-make project’ list and pinning. AWESOMENESS!

    Reply
    • brepurposed says

      July 13, 2014 at 3:34 pm

      Thank you so much Mary Beth! I can definitely relate 🙂 Thanks for sharing!

      Reply
  3. Michelle from Weekend Craft says

    July 2, 2014 at 9:32 am

    I have plans to do something similar just smaller scale! What a great Tut! Thanks so much for linking up last week at Creative Spark Link Party! Hope you stop by again today! http://bit.ly/1vvIGjo

    Reply
    • brepurposed says

      July 2, 2014 at 9:37 am

      I’d love to see yours when it’s done! Always love linking up at your party 🙂

      Reply
  4. Lisa at Mabey She Made It says

    June 30, 2014 at 11:20 pm

    I love this Bre!

    Reply
  5. Carrie This Home says

    June 27, 2014 at 9:07 pm

    I love how this turned out Bre! It’s such a great way to decorate when you’re renting. Thanks so much for sharing this at Frugal Crafty Home Blog Hop–this is going to be one of my features at our next party!

    Reply
    • brepurposed says

      June 28, 2014 at 11:31 am

      Aw thank so much, Carrie! Hope you have a great weekend 🙂

      Reply
  6. 5redherrings says

    June 27, 2014 at 8:35 pm

    Love this!

    Reply
    • brepurposed says

      June 28, 2014 at 11:31 am

      Thank you!!

      Reply
  7. Melissa @ Simply Sweets by Honeybee says

    June 26, 2014 at 12:52 pm

    I so need one of these in my life! It’s gorgeous!!!

    Reply
  8. Rachel says

    June 25, 2014 at 11:52 pm

    Love it! How did you get the new 2x4s to have not straight edges (it looks like the unfinished ones have some character on the sides)?

    Reply
  9. Justine Y says

    June 25, 2014 at 11:25 pm

    Looks great! I love pallet/wood backdrops! And pallets ARE a pain to rip apart, I did an accent wall in my son’s room adn it looks awesome, but it took a LONG time to collect and take apart all those pallets!

    Reply
    • brepurposed says

      June 26, 2014 at 10:45 am

      Thank you! Oh my gosh, yes they are a pain! Good for you for sticking to it and doing a whole wall!

      Reply
  10. katjeter says

    June 25, 2014 at 8:33 pm

    Beautiful! I’m pinning this and adding it to my (ever-growing) to-do list!

    Reply
    • brepurposed says

      June 26, 2014 at 10:44 am

      Thanks Kat! It doesn’t take long at all 🙂

      Reply
  11. Lauren @ The Thinking Closet says

    June 25, 2014 at 1:00 pm

    Wow! What an incredible finished piece. The combo of staining and white-washing gives it such a weathered vibe – – I would have never guessed that this wasn’t reclaimed wood. Well done, my dear! Looking forward to seeing this action in your blog photos to come!

    Reply
    • brepurposed says

      June 26, 2014 at 10:59 am

      Aw thank you so much, Lauren! It turned out even better than I expected and was so easy to “distress” 🙂 You’ll be seeing lots more of it around my blog!

      Reply
  12. Erlene says

    June 25, 2014 at 12:27 pm

    Looks fantastic. I really like how it came out when you “distressed” it.

    Reply
    • brepurposed says

      June 25, 2014 at 6:37 pm

      Thanks Erlene! It turned out even better than I imagined 🙂

      Reply
  13. Jillian says

    June 25, 2014 at 12:22 pm

    LOVE this project! Definitely adding it to the to-do list 🙂

    Reply
    • brepurposed says

      June 25, 2014 at 6:36 pm

      thanks Jillian!!

      Reply
  14. shonee says

    June 24, 2014 at 11:36 pm

    Looks awesome! I totally want to make one now 🙂

    Reply
    • brepurposed says

      June 25, 2014 at 10:31 am

      Thank you, you should!

      Reply
  15. Nicole B. says

    June 24, 2014 at 11:08 pm

    This is a fabulous idea!!! And I love that it kinda matches your blog background 😉

    Reply
    • brepurposed says

      June 25, 2014 at 10:31 am

      Thanks Nicole! I tried to match it as close as possible, good enough for me!

      Reply
  16. Havalah says

    June 24, 2014 at 9:44 pm

    that is awesome! I’m pretty sure our last neighbors thought I was crazy too. I’ll do anything for the best light and inside just doesn’t cut it sometimes. I definitely need to make one of those. So happy to just find your blog, I love it everything about it!

    Reply
    • brepurposed says

      June 25, 2014 at 10:32 am

      haha I know right?! My husband thinks I’m pretty crazy too, but you gotta do what you gotta do! So glad you stopped by and thank you for the kind words!

      Reply
  17. jarrahjungle says

    June 24, 2014 at 9:08 pm

    This looks so good, Im really into the wood look. Hey it even matches your blog background!

    Reply
    • brepurposed says

      June 24, 2014 at 9:59 pm

      Thank you! That was the whole idea 🙂

      Reply
  18. Selene Galindo says

    June 24, 2014 at 6:05 pm

    I need to make one of these ASAP!! I love the look of distressed wood and it would make one fabulous backdrop!!

    Reply
    • brepurposed says

      June 24, 2014 at 9:58 pm

      It certainly does, I’m loving it!!

      Reply
  19. Kelly @ A Side of Sweet says

    June 24, 2014 at 10:08 am

    This is AMAZING! I might steal this idea to make a new blogging backdrop! So, so awesome.

    Btw, found you via the social media challenge for #SITSblogging! 🙂

    Reply
    • brepurposed says

      June 24, 2014 at 1:41 pm

      Thank you SO much Kelly! Feel free to steal my idea 🙂 I’d love to see yours if you do! P.S. What is the social media challenge for #SITSblogging?!

      Reply
      • Kelly @ A Side of Sweet says

        June 24, 2014 at 3:07 pm

        Good question! SITS is a blogging group and right now they have issued a summer challenge to help us grow our social media following. You were one of the recommended accounts that Twitter suggested based on other people I follow. A lucky find for me! 🙂

        Reply
        • brepurposed says

          June 24, 2014 at 5:07 pm

          Oh awesome!! I’m so glad it brought you to me! I’ll have to check it out 🙂 Thanks for heads up!

          Reply
  20. howdothejonesdoit says

    June 23, 2014 at 9:23 pm

    Wow! You go all out! I love the new background on your blog too … it all looks so nice! I thought I was doing good with a piece of white fabric taped to my wall and draping over the top of a shelf for ebay pictures;0) Classy, eh?!

    Reply
    • brepurposed says

      June 24, 2014 at 10:25 am

      haha thank you so much! go big or go home right?!

      Reply
  21. Christina says

    June 23, 2014 at 12:38 pm

    This is a great idea!!! I never really thought to make a background for photos. So smart! It turned out awesome! 🙂

    Reply
    • brepurposed says

      June 23, 2014 at 2:16 pm

      Thank you Christina! I wanted my photos to look consistent and since I sell most of my pieces anyway, I figured a little backdrop would be perfect!

      Reply
  22. Kristi says

    June 23, 2014 at 10:15 am

    SOOOOO pretty!!! I’ve been dying to try my hand at some whitewashing! LOVE, LOVE, LOVE how it turned out!!!

    Reply
    • brepurposed says

      June 23, 2014 at 10:38 am

      Thanks girl! This was my first time trying it and I couldn’t believe how easy it was 🙂

      Reply
      • Hara says

        October 27, 2016 at 10:59 pm

        Hi,

        I love this! I want to create something like this for my baby’s first birthday. I’m planning on a rustic camping theme for his first. What kind of wood did you use and about how long did it take you to complete? I would appreciate any tips and information. Thank you!

        Hara

        Reply
        • brepurposed says

          October 31, 2016 at 10:52 am

          Hi Hara! That sounds so cute! I used 2x4s for mine but it made it super heavy. I would probably recommend something a little more lightweight for what you want. You could get a piece of plywood cut at Lowes or Home Depot to the size you want and then use strips of balsa wood that you can find at the craft store which are super light to get the look of the panels. That might be a good option for you!

          Reply

Trackbacks

  1. Wood Plank Backdrop Diy - Woodworking says:
    September 3, 2019 at 2:03 am

    […] Download Plan More @ brepurposed.porch.com […]

    Reply
  2. DIY Balsa Wood Planters | brepurposed says:
    August 7, 2018 at 10:57 am

    […] love to hear what you did! If you’re looking for another fun project, see how I made my DIY Photo Backdrop that I used behind these balsa wood […]

    Reply
  3. Farewell Porch! - brepurposed says:
    July 31, 2015 at 6:01 am

    […] any of the furniture makeovers I have without that amazing space. It was the perfect home for my backdrop (which yes, I’m taking with me; all 100+ pounds of it). And it allowed me to take photographs […]

    Reply
  4. Backdrop Update - brepurposed says:
    June 15, 2015 at 6:01 am

    […] [See the full tutorial HERE.] […]

    Reply
  5. 4 Essential Product Shots by The Birch Cottage says:
    May 1, 2015 at 3:02 pm

    […] also find a great tutorial from Bre at BrePurposed on a DIY Faux Distressed Wood […]

    Reply
  6. 50 Do-Able DIY Photo Backdrops — the thinking closet says:
    April 22, 2015 at 7:05 am

    […] be remiss if I didn’t give a shout-out to my blog buddy Bre who totally inspired me when she created a Faux Distressed Wood Backdrop for her blog photo […]

    Reply
  7. MCM Buffet :: Themed Furniture Makeover Day - brepurposed says:
    January 22, 2015 at 6:02 am

    […] And that’s it! I’m absolutely in love with this piece. We’re going to use it as our new tv stand but you know how it goes around here; poopy colored living room walls and terrible lighting means this guy gets a photo shoot outside against my DIY Backdrop Wall. […]

    Reply
  8. Table Transformation with Custom Blue Chalk Paint — the thinking closet says:
    July 28, 2014 at 7:02 am

    […] I’ve been really into this faux distressed look on wood lately which you can see on my DIY Backdrop and my DIY Rustic Sign. I still had a bunch of pallet wood left over and thought it would be the […]

    Reply
  9. Touring Through Blogland | brepurposed says:
    July 21, 2014 at 7:00 am

    […] of my favorite parts of the process. I love styling and staging my furniture, especially with my new backdrop. I seriously get so excited when I upload my photos and see the end result! My only problem is […]

    Reply
  10. The Creative Collection Link Party - The Cards We Drew says:
    July 12, 2014 at 8:28 am

    […] DIY Faux Distressed Wood Backdrop || Bre Purposed […]

    Reply
  11. The Creative Collection Link Party says:
    July 11, 2014 at 10:03 pm

    […] DIY Faux Distressed Wood Backdrop || Bre Purposed […]

    Reply
  12. Creative collection group link party says:
    July 11, 2014 at 5:45 pm

    […] DIY Faux Distressed Wood Backdrop || Bre Purposed […]

    Reply
  13. The Creative Collection Link Party - Classy Clutter says:
    July 11, 2014 at 5:00 pm

    […] DIY Faux Distressed Wood Backdrop || Bre Purposed […]

    Reply
  14. The Creative Collection Link Party - Giggles Galore says:
    July 11, 2014 at 12:00 pm

    […] DIY Faux Distressed Wood Backdrop || Bre Purposed […]

    Reply
  15. DIY Rustic Sign ‹ brepurposedbrepurposed says:
    July 9, 2014 at 6:02 am

    […] used the pallet wood that I had originally planned to use for my backdrop and pretty much used the same technique as well. I wasn’t quite sure how I was going to […]

    Reply
  16. Frugal Crafty Home Blog Hop says:
    June 29, 2014 at 9:00 pm

    […] linked up this awesome tutorial for her DIY Faux Distressed Wood Backdrop. […]

    Reply
  17. How to Attach Fabric to Furniture ‹ BrepurposedBrepurposed says:
    June 25, 2014 at 6:01 am

    […] missed my post, go read it now! But here’s a little sneak peak too. (Note how awesome my new backdrop […]

    Reply

Leave a Reply Cancel reply

hi I’m bre! follow along as we renovate our current home and share modern DIY ideas.

  • Facebook
  • Google+
  • Instagram
  • Pinterest
  • RSS
  • Twitter

Shop My Faves

We spent a few days this past week at the @thedwel We spent a few days this past week at the @thedwellbox in Amish Country and never wanted to leave! More and more lately we’re realizing the importance of family and nurturing those relationships. This was the perfect place to unwind, reconnect and enjoy an adventure together without worrying about capturing it all on our phones. We went for a hike, sat by the fire, ate wayyy too many pastries and cheeses and loved every minute of it. Sharing a video tour in stories today! If you’re in the area - we highly recommend a stay here!
FREE 2021 Printable Calendar is on the blog today! FREE 2021 Printable Calendar is on the blog today! As always, there’s two sizes for you to choose from and a short easy tutorial for you to follow to make the cute little wooden stand too 📅  My little office nook has gone through a lot of phases since we first moved in 4.5 years ago (swipe through to see them all!) and last year I finally upgraded my desk to one I could properly sit at 🤣 I took two Alex drawers from IKEA and added wood trim and caning for an elevated look and topped it off with a faux butcher block counter made from a $30 door slab. 👊🏻 the cherry on top for this space was our new skylight that instantly brightened it up and brings in so much beautiful natural light ☀️ this nook never felt quite right until now and I’m excited to spend more time here this year working on lots of exciting projects! Head to www.BREPURPOSED.com to snag your free calendar! #breinspired
Oh 2020. While it wasn’t what any of us expected Oh 2020. While it wasn’t what any of us expected I’m focusing on all the good that came out of it. I remember sitting with Dan New Year’s Eve last year and being so hopeful for what our future held and praying it would bring us another baby after we had been trying with no luck. I found out only a couple weeks later I was pregnant and that joy carried us through the year even though it brought fear and worry along with it. Besides welcoming our sweet baby girl into our lives we experienced so many other amazing things. The time we got to spend as a family is something we’ll always cherish. We worked on so many projects together and continued to pour our hearts into making this house a place we can call home. And we built A LOT of arches 🤣 Eloise was on the cover of a magazine, Hawk’s hair grew back in full force, we beat Covid and captain Christmas reminded us what the holiday season is really about.  but most importantly we leaned into god and relied on him more than ever to get us through each day. That’s the relationship I want to continue to work on and I’m grateful that this year nudged me closer to the One who deserves all the glory and continues to be faithful 🙏🏻 happy new year friends 🤍 cheers to 2021 🍾
wishing you all a very merry Christmas!🎄your lo wishing you all a very merry Christmas!🎄your love and support means the absolute world to our little family - thank you for being here with us! 🤍 #averybertolinichristmas
Family is here, Candles are flickering, fire is bu Family is here, Candles are flickering, fire is burning, and there’s a Christmas movie playing 🎄🔥 soaking up these last couple of days before the big guy comes 🎅🏻
#christmasiscoming #homefortheholidays
Unloading all the holiday photos from my camera ro Unloading all the holiday photos from my camera roll before Christmas is over 🎄 dan’s not going to be happy but those branches are staying up all winter - he might need to start wearing safety goggles in the house 🤪 #youllpokeyoureyeout
.
.
.
.
.
.
#bhghowiholiday #entrywaydecor #entrytable #neutralchristmas #holidayvignette #christmashomedecor #christmastable #mycb2 #countrylifestyle #mcgeeandco
Plotting ways I can stay right here all day and I’m thinking a Christmas movie marathon will do the trick 🎄🎅🏻❄️ how long do you think that would last before someone asks for a snack? 🙈 ONE WEEK til Christmas! 😱Are you done shopping and wrapping? What’s left on your Xmas bucket list?? #christmascountdown 
.
.
.
.
.
.
#cozyvibes #cozychristmas #mantledecor #christmashome #stayinbed #christmasbedroom #showemyourholiday #aidsundaysharies #fireplacedecor #lonnyliving #housebeautiful #rshome #idcoathome #ispyraddesign #aabhome
Which view do you prefer? 🤪 we compromise every Which view do you prefer? 🤪 we compromise every year: Dan and his dad get their giant artificial tree with colored blinking lights, handmade ornaments (and this year, tinsel) and I get my real tree with white lights and neutral ornaments. If you’ve been following all the Captain Christmas adventures on my stories you know I let Dan go all out and he hung tinsel garland and colored lights ALL over our house. I decorated a few small areas but I was getting SO unnecessarily stressed thinking about decorating our entire home and creating perfect content for you guys. So I said F it and it felt SO good. And it brought so much joy to him and the kids. And for that, it was worth it 🙌🏻 there’s nothing wrong with a beautifully styled Instagram worthy home but this time of year should be a reminder of the things that truly matter in life - and I don’t want to miss out on them. However you decorate for christmas I hope you can find joy in it 🙌🏻 and maybe let go of those picture perfect expectations a little 😉 captain Christmas stories are saved in a highlight! 🎄#2020 #breinspired #ohchristmastree

POPULAR POSTS: DIY LADDER SHELF | PAINTING TILE BACKSPLASH | HOW TO INSTALL WOOD LOOK TILE | PAINTING LAMINATE CABINETS | HOW TO REFINISH A DRESSER | DIY STEP STOOL | FAUX FIDDLE LEAF FIG TREE | BEST PLACE TO BUY THROW PILLOWS

PRIVACY POLICY

© Copyright 2021. brepurposed. All Rights Reserved. Designed by Oh Wild.