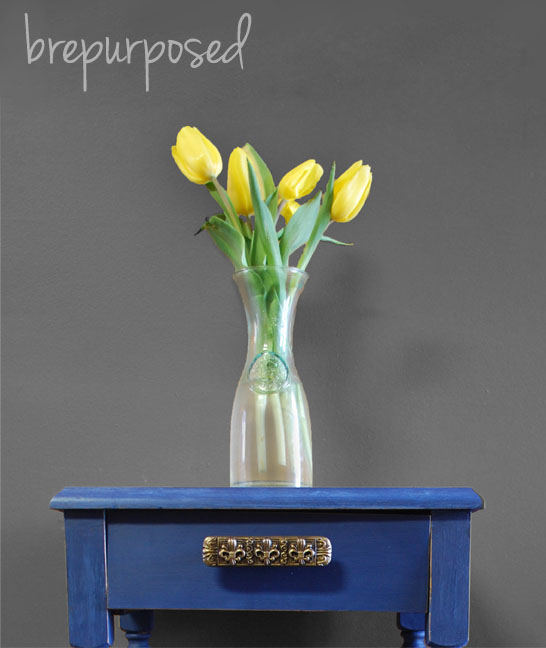
I’m so excited to share my first project with Chalk Paint®! I had such a great first experience with it and I know I’ll be using it many more times in the future. I started using it as soon as I got home from buying it and the fact that you don’t have to sand or prime before use makes this stuff so convenient (and perfect for people like me that are super impatient!) It’s great to use indoors because it has basically no odor at all. Which is great for this time of year. I don’t know about you, but I’ve been over this snow since the day after Christmas. I didn’t have any newly purchased pieces in mind for this paint, but we did have a beautiful little wood table sitting in the corner of our living room that I knew would be the perfect Chalk Paint® guinea pig. I fell in love with this color with my first brush stroke and love how my Napoleonic Blue Table turned out!


Just a little table that had a couple frames on it, not getting much love in the corner. I knew this would be the perfect piece to give a touch of blue to. I got some new hardware for the drawer so I had to fill in my holes first. I used Elmer’s Wood Filler and used Frogtape around the edges of the drawer for a clean finish.


I’m always nervous about using the wood filler and feel like no matter how smooth it feels, it’s still going to show through my paint. I’ve found that you just need to fill and sand and repeat at least a couple times to get the best finish. Even after a coat of paint I could still see the outline of the old holes, but after the second coat was dry, there was no sign of them. I have to admit when I first opened the can of paint, it looked a lot more blue than I was anticipating. I had seen some pieces where I got the paint, Le Jardin Florals & Furnishings, and knew what it looked like once applied, so I wasn’t too worried, but man does that look blue!

I flipped the table upside down and started painting the legs and worked my way down. I love that this stuff dries so quickly (about a half hour) and I was able to do two coats in what seemed like no time at all. I opted not to buy one of the Annie Sloan paint brushes. I had already spent way more than anticipated and I just couldn’t swallow that price tag. I use a Purdy brush and it worked great with this paint and I had no issues with it. After letting the second coat dry, it was time to tackle the wax. I ended up buying the clear wax and a small wax brush. I have never used wax as a finish before and was definitely a little anxious about the way it was going to turn out. After doing some research and watching tutorials, I scooped a small amount onto a paper plate and dabbed the brush into it from there. I found that brushing it on by making “x’s” was the easiest and most efficient way. Since I was going to distress, I applied one coat of the wax and wiped it off with a cloth, distressed the edges of the table with a fine grit piece of sand paper, and then applied another coat of wax, wiping it off again at the end. This stuff is super easy to work with and I love the finish that it gives the piece.  This paint is so easy to distress! I love it. It looked great even before the distressing, but I decided I wanted to give it a little more of a rustic look. I love the new hardware I found for it too. Hobby Lobby gets me every time.
Definitely a very successful first go with Annie Sloan Chalk Paint®! After I finished this piece, I was scouring my house for anything I could find to paint with it ha! A bright pop of yellow tulips goes perfect with this shade of blue.
Please disregard our terribly hideous carpet. If we weren’t renting that sucker would have been gone the day we moved in 😉

I’m going to hang on to this piece for now, but if it catches your eye and you’re interested, just let me know!
I want to thank Debbie Gast again from Le Jardin for hooking me up with this paint and being so helpful! I will definitely be heading back there soon, and if you live in the area, be sure to check it out!


doreen @ altered-artworks
Beautiful transformation! I’m just starting to use ASCP and love it (except for the price). I’ll be posting my new (old) nightstand on my blog soon.